Friday, November 18, 2016

Settings

Hello Parents!

A few weeks ago we learned about settings.  I used a thorough power point I found on the internet called "Story Settings: How to improve your writing!"  Even though its focus was on writing, I was still able to adjust it to apply to creating pictures.   It covered creating an atmosphere including things you can hear, touch, taste, and smell.  I couldn't load it to my blog, but if you are interested in it, leave a comment and I can send it to you.

We created a mountain setting with a lake and trees, then the students used their imaginations to fill in the rest.  Here are some pictures of their work:


Wednesday, November 16, 2016

Shape People

Hello again Parents!

We've been busy for the last couple weeks in Mrs. Green's classroom.  We've covered shape people, drawing settings, and mixing colors, but this post will only cover the shape people.

Shape people:
Since I have two separate Kindergarten classes some of our lessons don't match up.  For instance the last lesson with the Frankensteins was specifically for Halloween for Class A, but when it was Class B's turn Halloween was over.  So instead of doing a monster, the kids got to choose between kids running, biking, skating, and figure skating.  They voted on the running person and we did a guided drawing together so they could see how basic geometric shapes can come together to make a person.  They chose the runner and here are some examples of their work:


I only showed them how to do the figure, but as you can see some of the kids took liberties with faces, hats, and even a belly button. :)    This lesson was a little difficult for the class, but looking back on it, I'm glad I gave them something challenging because everyone was engaged and trying to figure out something they had never done before.  I think in the future I can mix up really challenging lessons with easier ones to keep them on their toes.

One of the difficulties I encountered in this lesson was some kids pushed waaaaay too hard on their pencils.  It made it hard for them to erase their mistakes later and muddied up their picture.  I think the next time I do this lesson I will have them use mechanical pencils since the lead will snap if the kids push too hard which will give them immediate feed back to whether or not they are pushing too hard.   That way they will learn to draw nice and light until they have the line they want, then they can trace over it harder.

Sunday, October 30, 2016

Frankenstein Guided Drawing

Hello Parents,

Are you as ready for Halloween as I am?  I hope so! I love this time of year because of the parties, spooky movies, parties, and of course trick or treating.  So it's no surprise that this past week's lesson was on Frankenstein and spooky settings.

This lesson was a guided drawing, which if you don't know, means that I showed the kids step by step how to make a specific Frankenstein image.  I will not always use this method, but I've found it helps at the beginning of a project to get it moving.  The students were very pleased with their pictures and so were me and Mrs. Green. Here are some of the finished images:
       
Teacher Example


Aren't these just great?

The next lesson we did was on settings.  The students learned what settings and characters were, as well as different ways they could represent a setting to make it peaceful, spooky, fun, romantic, etc.  I did a quick demo of a night scape with a simplistic abandoned house with broken windows, spider webs, monsters, and graves.  This was to give them ideas of what they could include in their own pictures.  Some students included traps, ghosts, blue moons, and fire.  I loved seeing their imaginations at work.  I wished we had more time so each student could explain their picture to their neighbor or the whole class.   Since this drawing was a free style drawing instead of a guided drawing, they were a little messier and harder to recognize, but the creativity behind them was strong and made their drawings individually interesting.
I forgot to take photos of their drawings, so once take those, I'll post them.
'Til next time!

Mrs. Kelli Brown
Art Scholar

Friday, October 14, 2016

Hello Kindergarten Parents!

Hello parents of the Windsor Elementary kindergarten class!

My name is Kelli Brown and I am going to be working alongside Mrs. Green for the next couple of months teaching art to you children.  I am a second year Arts Scholar from the Beverly Taylor Sorenson Arts Learning Program and senior at BYU majoring in Art Education.  I live in Provo, but am originally from Ohio where it rains constantly and the fall colors are magnificent.

You might wonder what I am going to be doing in the classroom? Mrs. Green and I are working together to integrate visual arts into the kindergarten core curriculum which will enhance your children's learning experience.  Our focus this fall is going to be on drawing which will help the kids develop gross and fine motor skills as well as an ability to stay on task for long periods of time.
Our first lesson, which was yesterday, was called Drawing Using Shapes.  In our lesson we reviewed basic two dimensional shapes, read a book call Wednesday (picture below)
and watched a video (https://www.youtube.com/watch?v=dazuuAjeLvE) on how you can use shapes to make different images.  Finally we did a guided drawing of  a person made out of shapes.  Everyone was able to finish before heading off to recess.  We will be reviewing this lesson after fall break and taking it a step farther by adding details and placing their people drawings in settings.

I am excited to be teaching your kids this semester because kindergartners are so sweet and creative!   I've already observed the classroom twice and taught once and think the kids are just great.    I look forward to our time together and hope you will reach out to me if you have an questions.

Kelli Brown
Arts Bridge Scholar

Friday, January 29, 2016

Arctic Habitat and Penguins

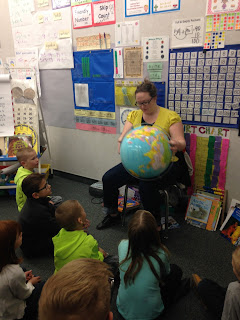
    It's cold outside!  So what better time to learn about the Arctic and Antarctic?  The playground last week was pretty icy, which I found out first hand during the surprise fire drill in the middle of the lesson.  On the way out, some of the kids were sliding down the ice like little pengins (which they're not supposed to do), but it was a great segway into our art lesson. Once we were allowed back in (thankfully the classroom was warm), we reviewed the Arctic and covered the Antarctic briefly.  We talked about penguins, where they live, what they eat, and how they take care of their young.
    Next I showed them the demos of the penguins I made for them.  One was realistic, one was cartoony, and I asked them to point out the basic shapes.  Since the realistic penguin would take too long, we opted for the cartoony penguin, which the kids were excited to make since it was cuter.  Plus it had googly eyes, and who doesn't like that?
    Once the kids all had their materials, they did great.  It helped that this clay was not nearly as messy as the traditional clay we used for the elephants (nor will it explode- since it doesn't need to be fired).  However, it was pretty cold and stiff, and it took a while for the kids to be able to warm it and mold it. Once it was warm, we did a step by step lesson making basic shapes of the cartoon-like penguin (sphere, cyclinder, cone...) by hand building.
    By the end of it, each student had formed all the pieces to make the penguin and the only thing left to do is to stick the pieces together and put on the googly eyes.  That will have to wait until next week when I come back to help them finish up.
    I came really close to finishing with enough time for cleanup, and I would have too if it weren't for that fire drill!  Grrrr.  Anyway, moving on...
  Next time we'll finish our penguins and paint our elephants (and for those whose elephants blew up, you'll have a chance to remake one).  It'll be a work day and I look forward to finishing the projects.  See you next time!


Wednesday, December 23, 2015


Above: Finished Elephants drying out and waiting to be fired.


Elephants: Part 2 

Time is a valuable thing in the classroom, as I am learning. 


Since we ran out of time the last class period, Mrs. Butikofer kindly made space in her schedule for me to come finish up the project with the kids 2 weeks later.  We were tight for time, between spelling tests, recess, and early dismissal, so she set up a table in the corner of the room and I worked with 5 students at a time, slowly rotating through all of them.  Having a small group like that was easy to manage, and it built anticipation in the kids who had to wait their turn.  This made them eager to work on it and not dawdle or fool around.  
I gave the students the option to stay in from recess to work on their elephants, and a handful did!  Any 2nd grader who it willing to give up recess for an art project must really be excited for it. I love seeing their enthusiasm!
What I’ve learned…
However, if there’s one thing I’ve learned from this project, it’s plan ahead for time.  I miscalculated how long it would take to finish the elephants, and if I could do the project over I would have done a simpler project that could be done in an hour and a half, like a rolled out python or something.   Elephants are a very hard project, what with inserting wet newspaper, scoring, slipping, attaching, and forming.  I was pleased to see that 2nd graders could do the project, and I was very proud of them, it is just taking a long time.  
That being said, once the new school year starts, we will start a new habitat project covering the Arctic.   During that time we will squeeze in time to paint the elephants.  I can’t wait to see how they turn out!
In the mean time, enjoy Christmas Break and your loved ones!


Merry Christmas Everyone and a Happy New Year!

Above: Still drying...

Thursday, December 3, 2015

Clay Elephants!

Hello again parents!
We finally got to play with clay in the classroom!  It was so fun, but sooooo messy.  I didn't anticipate the amount of clean up I needed to stay after and do.
We were learning about the Savannah habitat, and I thought it would be fun to make a herd of animals for the Savannah.  I decided on elephants because they have strong sturdy legs that wouldn't break off, like giraffes or gazelles.

The first thing I did was show the students videos on how to score and slip pieces together (which is SO IMPORTANT when working with clay), then I showed them a video of how to insert moist newspaper inside of the legs, body, and head so the elephants won't crack in the kiln.  After that, I did a demo, then turned them all loose to make their elephants.  They followed me in a step by step approach, which Ms. Butikofer so wisely recommended, so we were all on the same step most of the time. Toward the end, some kids moved ahead, so we'll have to catch everybody up to the same place next time.

I thought we would finish up in one day, but I was way off.  We're going to need two more weeks before they're done.  One week for finishing forming and reinforcing attachments, and another for  firing and painting.  We opted to paint instead of glaze because Ms. Butikofer already had acrylic paints on hand that were nice Savannah colors.  

I was so impressed by the dexterity of these second graders! This was a hard project and they jumped right in an did it!  That just shows, with a little be of extra time these students can do amazing things. I can't wait to see how they turn out.

I'll be up again tomorrow finishing up phase one.

Until next time!